

You’ve been putting it off for two weeks. Maybe three. The vet mentioned at the last visit that your puppy’s nails are getting long, and you smiled and nodded and then went home and Googled it and immediately felt more anxious than before.
The quick. The bleeding. The way your puppy squirms like you’re trying to commit a crime against them. The specific horror of black nails where you literally cannot see where the safe zone ends.
Here’s the thing nobody tells you upfront: cutting puppy nails is a skill, and like any skill, it feels terrifying before you’ve done it and surprisingly manageable after you have. The first time is the hardest. The second time is easier. By the tenth time, you’ll do it while watching television.
But there’s a real order of operations that makes the difference between a puppy who tolerates nail trims and one who turns into a completely different animal the moment they see the clippers. This guide covers all of it — the tools, the technique, the quick situation, what to do when you inevitably nick it, and the desensitization protocol that is honestly more important than any of the cutting steps.
Key Takeaways
- Start with paw handling before you introduce any tools. A puppy who tolerates their paws being touched will cooperate for nail trims. A puppy who hasn’t had this foundation will fight you every time.
- The quick grows with the nail. Long, overgrown nails have longer quicks — which is part of why nail trimming feels riskier when you’ve let it go. Regular trims every 2 to 3 weeks keep the quick receded and make each session easier.
- Black nails are manageable, not impossible. Look for the dark grey oval that appears in the nail’s cross-section as you trim — that’s your stop signal.
- Cutting the quick is not a catastrophe. It happens to every owner. Styptic powder stops the bleeding in seconds. Your puppy will recover faster than you will.
- One nail per session is a legitimate strategy. Especially at the start. Getting through 18 nails doesn’t have to happen in one sitting.
Why Your Puppy’s Nails Actually Need Regular Trimming
Before getting into the how, it’s worth understanding the why — because it makes you more motivated to actually do it.
When nails grow too long, they change how your puppy bears weight. Instead of standing flat with weight distributed through the pads, long nails push the toes upward, which shifts weight onto the heels and gradually affects posture and gait. This is not a cosmetic issue — it’s a skeletal and joint issue that accumulates over months and years.
Long nails also snag on carpet, bedding, and upholstery — creating split nails that are painful and often require veterinary attention. And dewclaws, the small nails positioned higher on the inside of the leg that don’t touch the ground at all, can grow in a circle and curl back into the skin if never trimmed. This is genuinely painful and entirely preventable.
The practical rule: if you can hear your puppy’s nails clicking on hard floors when they walk, they’re overdue for a trim.
How Often to Cut Puppy Nails
Most puppies need their nails trimmed every 2 to 3 weeks. This varies based on:
Surface they walk on: Puppies who walk regularly on concrete or pavement experience natural nail wear and may need less frequent trimming. Puppies who spend most of their time on grass or carpet get no natural wear and need more frequent attention.
Growth rate: Some puppies grow nails faster than others. Check by looking at the nail from the side — if there’s a visible downward curve, it’s time.
Quick length: Here’s the virtuous cycle of nail care. Regular trimming causes the quick to gradually recede — moving further from the nail tip over time. This means each subsequent trim can safely go a little shorter. Dogs who haven’t been trimmed regularly have long quicks, which is why catching up on overgrown nails requires a different approach (see below).
The mistake most new owners make: waiting until the nails are obviously too long, doing an uncomfortable trim, and then waiting again until they’re obviously too long. This cycle keeps the quick long, makes each session feel risky, and trains the puppy that nail time is always unpleasant. The alternative — consistent, short sessions every 2 to 3 weeks — is dramatically easier for everyone.
Clippers vs. Grinder: Which One to Use
This is one of the most common questions in puppy forums, and the honest answer is: it depends on your puppy, not on a universal recommendation.
Nail Clippers
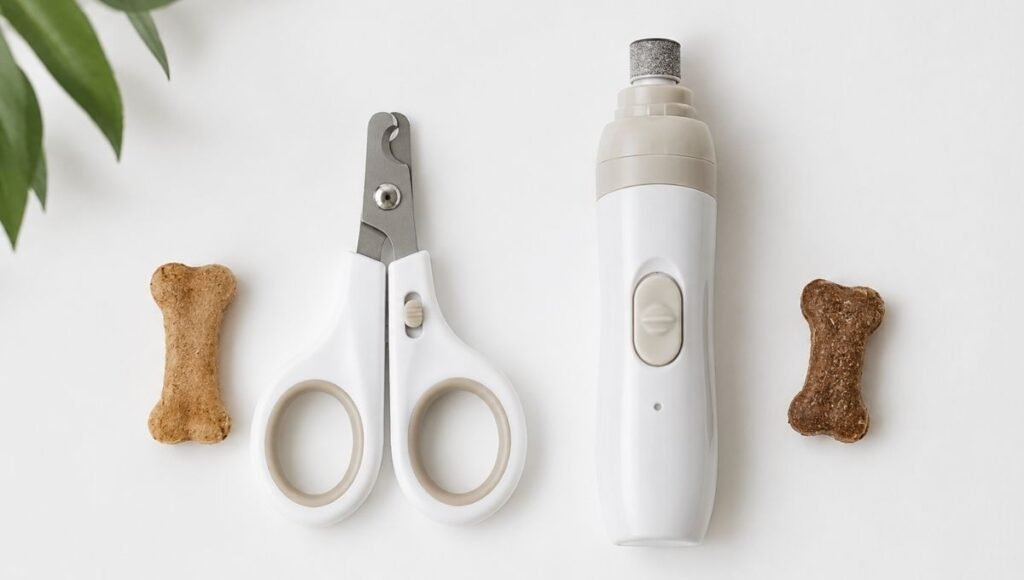
Scissor-style clippers work like large scissors and are generally preferred for medium and large breed puppies with thicker nails. They provide good control.
Guillotine-style clippers have a hole where you insert the nail and a blade that comes up to make the cut. They work well for small breed puppies with thinner nails but can require more frequent blade replacement to stay sharp.
Advantages of clippers: Fast. No noise to desensitize to (just the click of the cut). Work immediately. Most readily available.
Disadvantages: The cutting motion can crush the nail if blades aren’t sharp, creating a splintering sensation. Less forgiving if positioned incorrectly.
Nail Grinder (Dremel)
A nail grinder — either a pet-specific grinder or a modified Dremel tool — sands the nail down gradually rather than cutting it.
Advantages of grinders: Significantly harder to hit the quick because you’re removing small amounts at a time. Creates a smooth, rounded edge rather than a sharp cut edge. Many owners who’ve had bad experiences with clippers find grinders dramatically easier.
Disadvantages: The noise and vibration require a desensitization process before use — you can’t just turn it on and start grinding on a puppy who has never heard it. Sessions take longer. Heat can build up with prolonged use on one nail.
The honest recommendation: Start with clippers for simplicity. If your puppy develops a strong clipper aversion — hiding when they see them, fighting more than usual, making the process genuinely miserable — try a grinder. Many owners who switch report a significant improvement in their puppy’s cooperation.
Whatever you use, sharp tools matter. Dull clippers are the most common cause of bad nail trim experiences — they compress and crush before they cut, which is uncomfortable and increases the chance of splintering.
The Foundation You Need Before You Ever Cut a Nail
This is the section most guides skip, and it’s the most important one.
A puppy who hasn’t had their paws regularly handled will instinctively pull away when you try to hold their foot. That flinching and pulling makes accurate nail cutting nearly impossible and turns every session into a wrestling match.
The solution is paw desensitization — building a positive association with having paws held and touched before any tools enter the picture.

The 7-Day Paw Comfort Protocol
This protocol, adapted from AKC grooming guidance and cooperative care training principles, takes about 2 to 3 minutes per day.
Day 1: During a calm moment — while your puppy is relaxed after play or during a cuddle — gently touch one paw. Hold it briefly, release, give a treat. Do this 5 to 10 times with each paw. Nothing else. Just touch and treat.
Day 2: Hold each paw for 3 to 5 seconds while gently handling the individual toes. Release, treat. If your puppy pulls away, let them and try again more briefly. Never force the hold.
Day 3: Introduce the clipper or grinder. Don’t use it — just set it nearby while you handle the paws. Let your puppy sniff it. Treat.
Day 4: Touch the clipper to each paw without cutting. For clippers: squeeze them so the puppy hears the click, but not on the nail. For grinders: turn it on briefly nearby so they hear the sound, then off, then treat.
Day 5: Touch the grinder to one nail without grinding, or position the clipper around one nail tip without cutting. Treat.
Day 6: Trim the very tip of one nail only. One nail. Treat heavily.
Day 7: Trim one nail per paw. Finish with a jackpot treat — something high-value you don’t give regularly.
Over the following weeks, gradually increase the number of nails per session as your puppy’s tolerance builds. The goal is to make nail trimming so routine and so consistently rewarded that it stops being a production.
How to Actually Cut the Nails: Step-by-Step
Once your puppy is comfortable with paw handling and tool introduction, here’s the trim process.
Step 1: Position
Small puppies: cradle in your lap, belly up, or sit on the floor with them between your knees facing away from you.
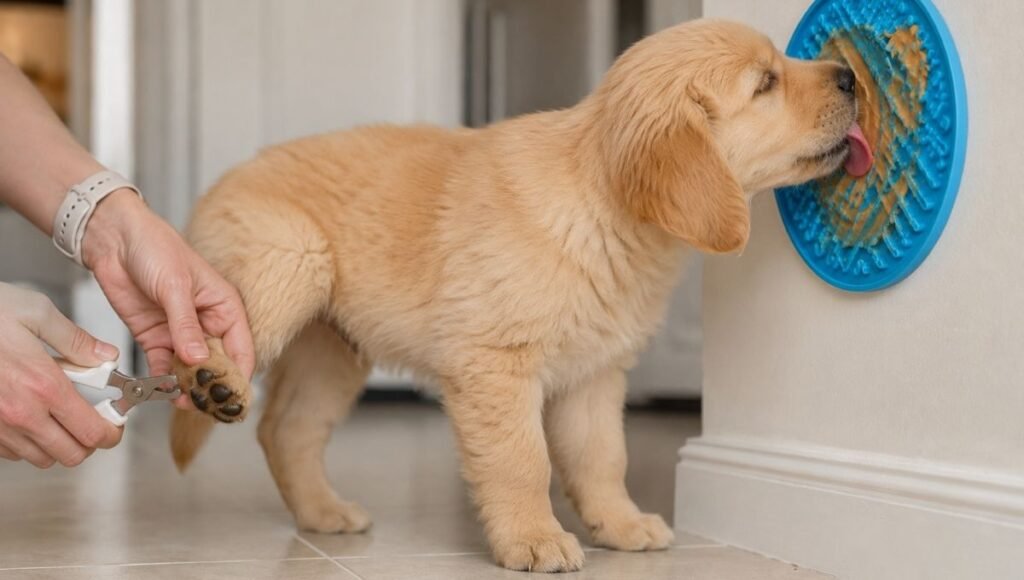
Larger puppies: have them lie on their side on a non-slip surface. A lick mat with peanut butter (xylitol-free) or soft cheese pressed to a surface nearby gives them something to focus on.
Good lighting is non-negotiable. Use a bright lamp or work near a window. You cannot identify the quick in dim light.
Step 2: Hold the Paw
Hold firmly but not tightly. Press gently on the pad to extend the nail slightly. If your puppy is pulling, apply gentle counter-pressure and wait for them to relax before cutting — don’t fight the pull.
Step 3: Identify the Safe Zone
Light-colored nails: The quick is visible as a pink area that runs from the base toward the tip. Cut below the quick, leaving a few millimeters of nail beyond the pink zone.
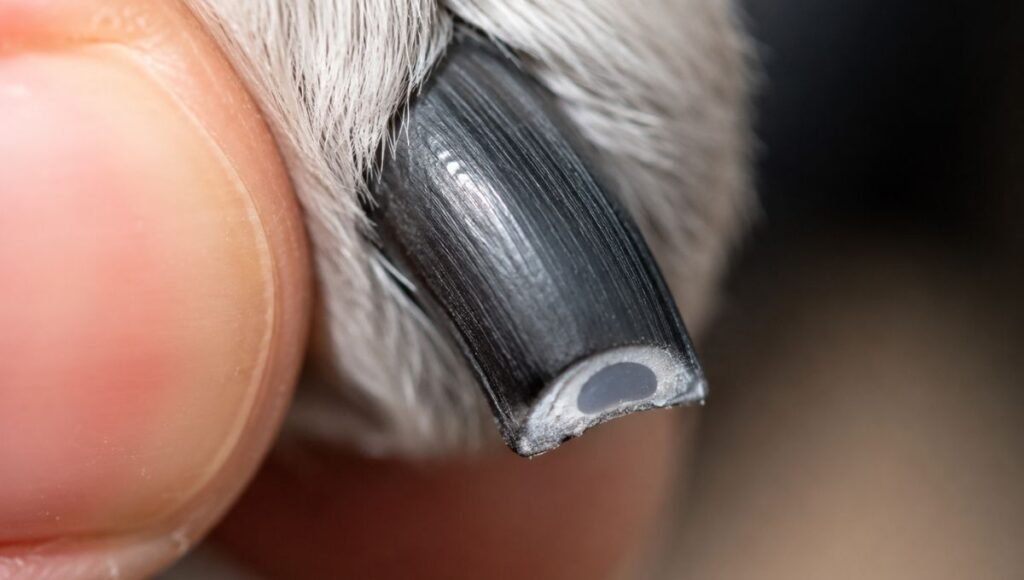
Dark or black nails: You cannot see the quick directly. Instead, trim in very small increments — 1 to 2 mm at a time. After each small cut, look at the cut surface head-on. You’ll initially see a white or chalky cross-section. As you get closer to the quick, the center of the cut surface will develop a small dark grey or black oval or dot. That dot is your stop signal. Stop immediately when you see it.
Step 4: Make the Cut
Position the clipper at a slight angle — roughly 45 degrees, cutting from below rather than straight across. For grinders, hold the tool perpendicular to the nail tip and use short passes rather than sustained contact on one spot.
Cut one nail. Give a treat. Pause. Move to the next. Going slowly and rewarding between each nail takes longer but produces a significantly more cooperative puppy over time.
Step 5: Don’t Forget Dewclaws
The dewclaw — the small nail on the inside of the leg above the paw — doesn’t touch the ground and doesn’t wear naturally. It’s easy to miss and can grow very long very quickly. Check and trim dewclaws every session.
What to Do When You Hit the Quick
You will hit it at some point. This is not a question of if — it’s a question of when. It happens to experienced groomers. It happens to veterinarians. Your reaction in the moment determines whether this becomes a setback or just a moment.
First: don’t panic. Your puppy feels the pain signal immediately but takes their cue from you. A calm response — “oops, it’s okay” in a normal voice — communicates that this is not a crisis.
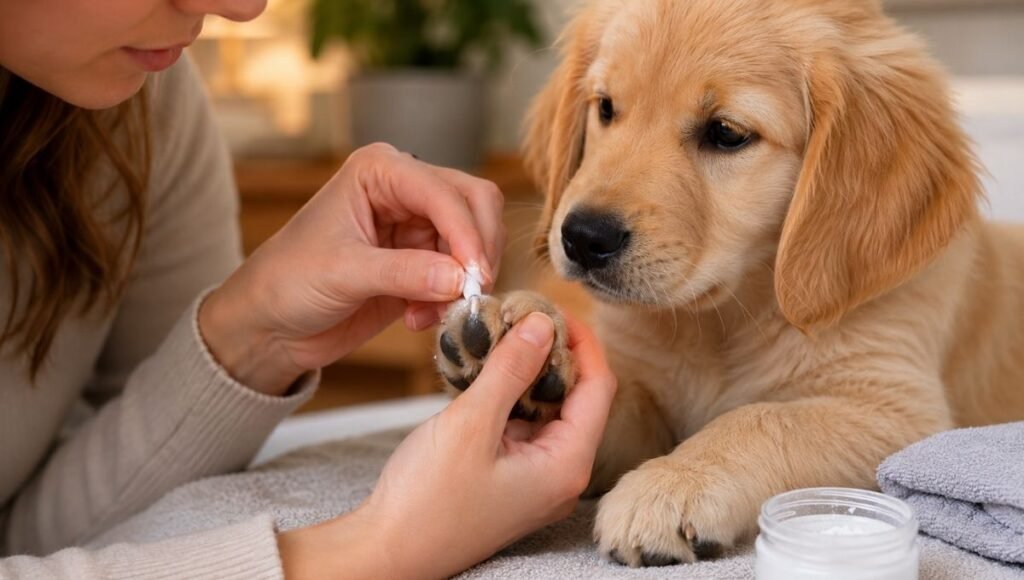
Apply styptic powder immediately. This is the only thing you need, and you should have it before you ever start trimming. Press a pinch of styptic powder against the nail tip for 10 to 15 seconds. Bleeding stops within 30 to 60 seconds in almost all cases.
No styptic powder? Cornstarch or baking powder work as substitutes. A bar of soap pressed against the nail tip (the soap fills the blood vessel) also works in a pinch.
After the quick is cut: Give your puppy a high-value treat. End the session for today. Don’t immediately try to cut more nails — finish on a positive note and pick up where you left off next session.
The long-term impact: If you respond calmly and the quick cut is a one-time incident, most puppies recover their comfort with nail trimming quickly. If it becomes a pattern — quick cuts regularly, no positive reinforcement — you’ll develop a puppy who actively dreads nail time. Consistency of positive reinforcement matters more than any individual incident.
Catching Up on Overgrown Nails
If you’ve let the nails get significantly long — clicking loudly, starting to curve — you can’t cut them to an ideal length in one session. The quick has grown long with the nail, and cutting to the ideal length would require going through the quick.
The correct approach: trim a small amount consistently every week. Over 4 to 6 weeks of weekly trims, the quick will gradually recede, allowing each subsequent trim to go slightly shorter. This is slower but the only safe way to address significantly overgrown nails.
If the nails are extremely overgrown or have begun to curve toward the pad, have a groomer or veterinarian handle the first trim. They can assess how far back is safe and either trim professionally or advise on the catch-up schedule.
If Your Puppy Completely Refuses
Some puppies develop strong nail trim aversion — especially if they’ve had a painful experience with the quick, or if early introductions were rushed. This is not permanent, but it requires a restart.
Go back to square one: paw handling with no tools. Weeks of nothing but touching paws and treating. Then reintroduce the tools from scratch, even more gradually than the 7-day protocol. The investment in desensitization at this point is the only thing that produces lasting change.
Tools that help with resistant puppies:
Lick mats: A silicone mat with peanut butter, cream cheese, or wet food pressed onto it and mounted on the wall or fridge door gives your puppy something intensely absorbing to focus on during the trim. This is probably the single most effective management tool for squirmy or resistant puppies.
Two-person approach: One person handles treats and distraction, one handles the trim. Removes the need to multitask.
Scratch board: A rough-surface board mounted at paw height that your puppy learns to scratch — which naturally files the front nails. Not a substitute for trimming (doesn’t address rear nails or dewclaws) but useful for maintaining length between sessions for front nails.
Only Have 10 Minutes? Here’s What to Do
Nail trimming doesn’t require a dedicated grooming session. These micro-approaches work:
One nail per day: 30 seconds, one treat, done. Over 18 days you’ve done the full set. This is a completely legitimate strategy and often produces the most cooperative long-term behavior because the volume is so low it never feels like a big deal.
Paw handling only: If your puppy is having a high-energy day and you don’t trust the session to go well, just do paw touching. Two minutes of handling paws while treating. This counts. It maintains the positive association and costs you almost nothing.
Post-walk trim: Tired puppies cooperate better. After a walk or play session, when your puppy is naturally calmer, is often the most productive window for trimming.
FAQ: What New Puppy Owners Actually Search For
How often should I cut my puppy’s nails? Every 2 to 3 weeks for most puppies. If you hear clicking on hard floors, they’re overdue. The more regularly you trim, the shorter the quick recedes over time, making each subsequent trim easier and safer.
How do you cut black puppy nails without hitting the quick? Trim in very small increments — 1 to 2 mm at a time — and look at the cut surface after each small trim. The center will initially appear white or chalky. When a small dark grey or black oval appears in the center of the cut surface, stop immediately. That dot indicates you’re close to the quick.
My puppy screams when I try to cut their nails — what do I do? Go back to basics: paw handling without tools, for several weeks. The screaming is a conditioned fear response, usually from either insufficient desensitization or a previous painful experience. Restarting the desensitization protocol slowly is the only effective long-term solution. Consider switching to a grinder, which many previously-traumatized dogs find less alarming.
What if I cut the quick and it won’t stop bleeding? Apply styptic powder (or cornstarch) with firm pressure for 30 to 60 seconds. This stops bleeding in almost all cases. If bleeding continues past 10 minutes or is flowing heavily rather than seeping, call your veterinarian. Note: nails bleed more than they look like they should — a small amount of blood is normal and stops quickly with styptic powder.
Clippers or grinder — which is better for puppies? Start with clippers for simplicity. If your puppy develops significant aversion to clippers, try a grinder. Many owners report grinders work better for resistant dogs because the incremental grinding makes it nearly impossible to hit the quick. The noise desensitization process takes a few days but is worth it for puppies who fight clippers.
Can I use human nail clippers on my puppy? Not recommended. Human nail clippers are designed for flat nails and can crush or split a puppy’s curved nails rather than cutting cleanly. Pet-specific clippers or a nail grinder designed for dogs is the appropriate tool.
How do I know if my puppy’s nails are too long? Stand your puppy on a flat surface. If the nails touch the floor when standing, they’re too long. If you hear clicking on hard floors when they walk, they’re too long. Nails should ideally clear the floor by a small margin and have no audible contact during normal movement.
The Bottom Line
The first time you cut your puppy’s nails will probably feel harder than it actually is. That’s normal. The anxiety of potentially hurting them, the squirming, the quick situation — all of it feels bigger before you’ve done it than it does during.
What makes the long-term difference is not perfect technique on session one. It’s the paw handling habit established in the first weeks, the consistent every-2-to-3-week schedule that keeps the quick receded, the calm response when things don’t go perfectly, and the genuine rewards that help your puppy associate paw time with good things rather than dread.
Nail care is a lifetime commitment — potentially thousands of trim sessions over the course of your dog’s life. The investment you make now in building a cooperative puppy is an investment you’ll benefit from for the next decade.
Start with one nail today. Give a treat. End there if you want to. That’s still a session.
What to Read Next
Nail care is one part of your puppy’s first-year routine:
- New Puppy Checklist: Everything You Need Before Day One — Complete preparation guide including grooming supplies to have ready before your puppy arrives
- Puppy Development Stages: Week-by-Week Guide — How your puppy’s tolerance for handling develops alongside their physical growth
- Puppy Teething Guide: Timeline, Symptoms and How to Help — The teething phase that coincides with peak nail trimming introduction and how to manage both
- Puppy Proofing Your Home: Room-by-Room Guide — Creating the safe environment that makes all first-year puppy care go more smoothly
- What Puppy Kennel Do You Actually Need? — How a well-introduced kennel supports calm handling and grooming throughout the first year
References
- American Kennel Club / Reisen, J. (2026). How to Trim Dog Nails Safely. akc.org
- Purina / Veterinary Team. (2026). How to Cut Puppy Nails. purina.com
- VCA Animal Hospitals / Veterinary Team. (2024). Trimming Your Dog’s Nails. vcahospitals.com
- American Veterinary Medical Association. (2024). Pet Care: Grooming. avma.org
- Seibert, L.M., & Landsberg, G.M. (2008). Diagnosis and management of patients presenting with behavior problems. Veterinary Clinics of North America: Small Animal Practice, 38(5), 937–950.